


While coming across the word ‘Authentication’, the first thought comes in our mind is the login page submitting our data to the web server and then checking it with the data base. Well, there is much more than this in the Authentication. We will discuss in the detail.
Let’s understand the difference between Authentication and Authorization
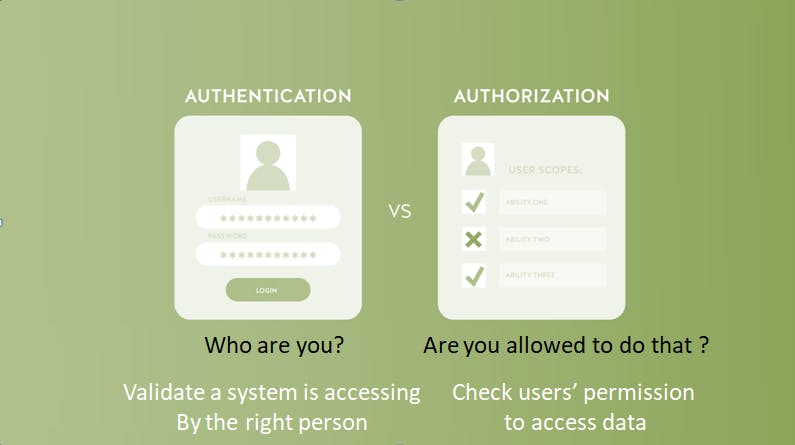
Security is the major concern in the web or app development. The basic terms used in this process is Authentication and Authorization. In authentication process, the identity of users are checked for providing the access to the system. While in authorization process, person’s or user’s authorities are checked for accessing the resources. For example, the process of verifying and confirming employees ID and passwords in an organization is called Authentication, but determining which employee has access to which floor is called Authorization.
What is meant by Authentication?
To understand the fundamentals of authentication, let’s begin by taking an easy example. Let’s assume, you are working on some file and now you want to share that file to a person named XYZ over OneDrive. So, the purpose of authentication, in this case, is to make sure that only XYZ can access that document.
As mentioned before, authentication is the process of verifying identity. A unique identifier is associated with a user which is the username or user id. Traditionally, we use a combination of username and password to authenticate a user. The authentication logic has to be maintained locally so we will term it local authentication. Apart from local authentication, we can use Oauth. Let’s cover step by step.
Authentication Types
Basic Authentication
Cookie Based Authentication
Token Based Authentication
Third party access(OAuth, API-token)
Basic Authentication
Basic authentication is a simple authentication scheme to authenticate the access to the resources over HTTP. The client sends HTTP requests with the Authorization header that contains the word Basic word followed by a space and a base64-encoded string username: password .
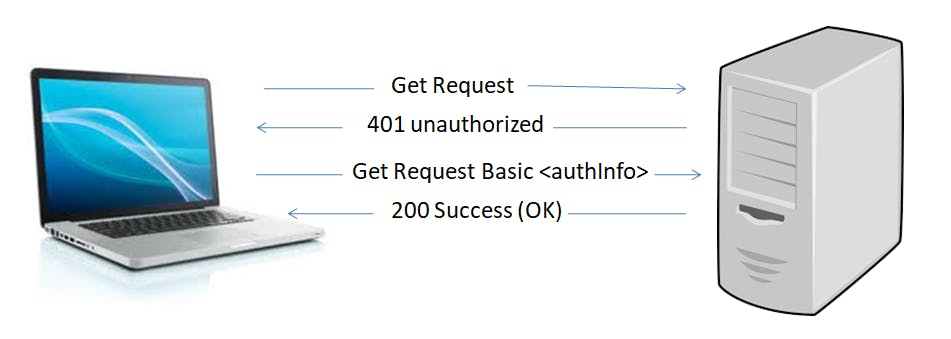
Lets See the working of Basic authentication -
- The user submits the credentials.
- The concatenation takes place in username and password as a single string as username: password
- The string gets encoded using base64 algorithm
- The Basic keyword is put before this encoded value and send it along each HTTP Request.
Cookie Based Authentication
Cookie-based authentication is stateful, meaning that the client and server will need to keep the token to manage a session between pages for a user.
A cookie is a name value pair of the user’s unique identifier and generated token that has an expiry date. The cookie is typically stored on both the client and server. The server will store the cookie in the database, to keep track of each user session, and the client will hold the session identifier.
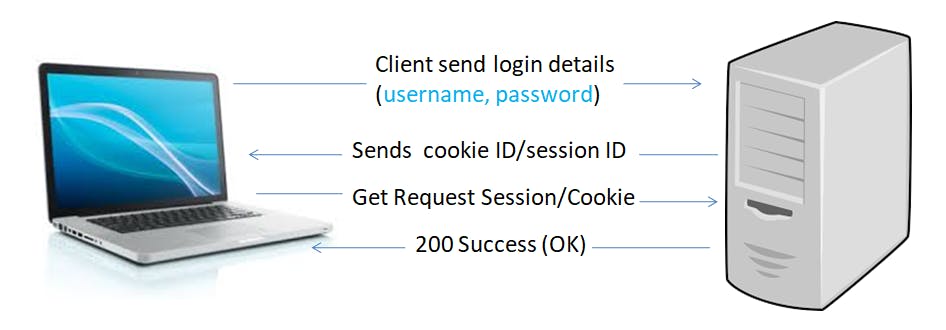
Lets See the working of Cookie Based authentication -
- User logins by entering credentials
- Server verifies that the user’s credentials are correct, and creates a cookie with the session info which is stored in the database
- The cookie, with the session ID and other information, is also stored in the browser
- When the user navigates through various pages on the browser, the cookie is verified against the database to validate if the user credentials are valid
- When the user logs out, the session is also deleted from the database
Token Based Authentication
When we talk about token-based authentication, we often refer to JWT (JSON Web Token), because it has been widely used in all industries and has become a de-facto standard for authentication. JWT is an open standard that defines a compact, secure, and self-contained way to transmit data between parties in JSON. JWT is a stateless type of authentication. It means that the server doesn’t store any session information in the database. It doesn’t need to keep a record of which user has logged in or which token is issued for which user. Instead, the client will send subsequent requests to the server with a header in the format of bearer-(JWT-token}, or more often, the client will send it in the body of a POST request or as a URL parameter
A JSON Web Token contains 3 parts:
- Header: Define token type and the signing algorithm involved in this space.
- Payload: Define the token issuer, the expiration of the token, and more in this section.
- Signature: Verify that the message hasn’t changed in transit with a secure signature.
- Therefore, a JWT typically looks like the following.
xxxxx.yyyyy.zzzzz
Let’s break down the different parts.
Header
The header typically consists of two parts: the type of the token, which is JWT, and the signing algorithm being used, such as HMAC SHA256 or RSA.
For example:
{
  "alg": "HS256",
  "typ": "JWT"
}
Then, this JSON is Base64Url encoded to form the first part of the JWT.
Payload
The second part of the token is the payload, which contains the claims. Claims are statements about an entity (typically, the user) and additional data. There are three types of claims: registered, public, and private claims.
- Registered claims: These are a set of predefined claims which are not mandatory but recommended, to provide a set of useful, interoperable claims. Some of them are: iss (issuer), exp (expiration time), sub (subject), aud (audience), and others.
Notice that the claim names are only three characters long as JWT is meant to be compact.
- Public claims: These can be defined at will by those using JWTs. But to avoid collisions they should be defined in the IANA JSON Web Token Registry or be defined as a URI that contains a collision resistant namespace.
- Private claims: These are the custom claims created to share information between parties that agree on using them and are neither registered or public claims.
An example payload could be:
{
  "sub": "1234567890",
  "name": "Aniruddha Joshi",
  "admin": true
}
The payload is then Base64Url encoded to form the second part of the JSON Web Token.
Do note that for signed tokens this information, though protected against tampering, is readable by anyone. Do not put secret information in the payload or header elements of a JWT unless it is encrypted.
Signature
To create the signature part you have to take the encoded header, the encoded payload, a secret, the algorithm specified in the header, and sign that.
For example if you want to use the HMAC SHA256 algorithm, the signature will be created in the following way:
HMACSHA256(
  base64UrlEncode(header) + "." +
  base64UrlEncode(payload),
  secret)
The signature is used to verify the message wasn’t changed along the way, and, in the case of tokens signed with a private key, it can also verify that the sender of the JWT is who it says it is.
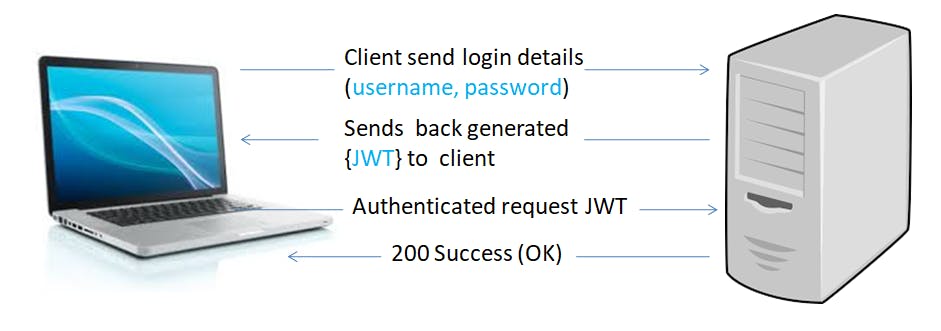
Lets See the working of Token Based authentication -
- User logins with their credentials
- Server verifies the user’s credentials, creates a signed token, and sends the token back to the client.
- The token is stored in either local-storage or session-storage on the client-side.
- Subsequent requests to the server will include this token, usually embedded in the header in the format of bearer-{JWT-token}
- Once the user logouts, the token is destroyed on the client-side; no interaction with the server is required because the server is stateless.
Third party access(OAuth, API-token)
Third party access, if we have a need to expose our API’s outside of our system like third party app or even to access it from mobile apps we end up in two common ways to share the user information. Via API-token which is same as JWT token, where the token will be send via Authorization header which will get handled at API gateway to authenticate the user. And the other option is via Open Authentication(OAuth),OAuth is a protocol that allows an application to authenticate against server as a user. The recommendation is to implement OAuth 1.0a or OAuth 2.0. OAuth 2.0 relies on HTTPS for security and it currently implemented by Google, Facebook, Twitter etc., OAuth 2 provides secured delegate access to a resource based on user. OAuth 2 does this by allowing a token to be issued by Identity provider to these third party applications, with the approval of user. The client then uses the token to access the resource on behalf of that user.
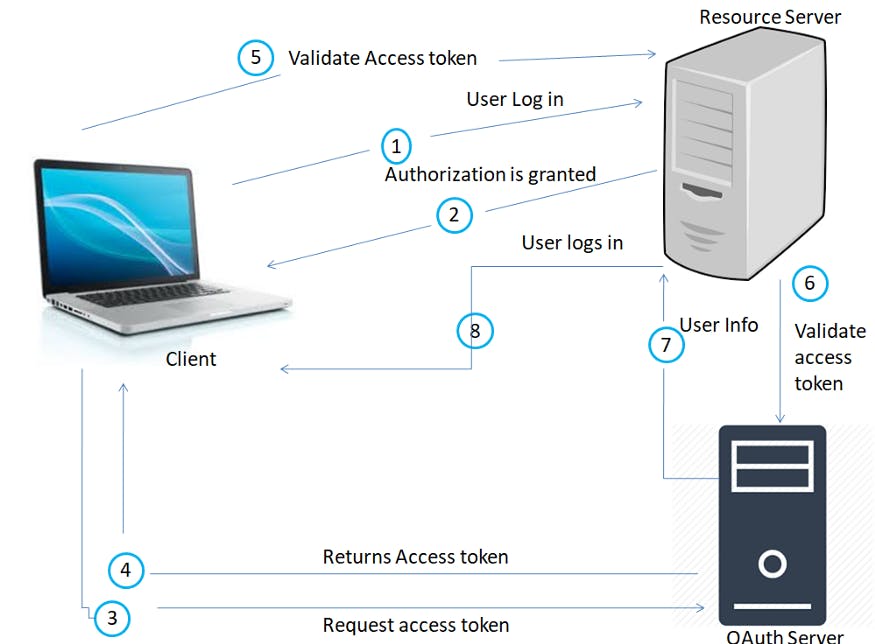
Lets See the working of Open Authentication(OAuth) -
- User sends an authentication request to Google/Facebook.
- On finding that the user has an account on Google, the Google server responds with an authorization grant.
- The requesting application uses the authorization grant access specific information.
- On gaining the permission, the app generates an access token.
- The client then uses the access token to access a resource.
Conclusion
There isn’t a one-method-fits-all best approach for authentication, but there is a preferred way depending on your application’s use case. Every authentication mechanism has its own advantages and disadvantages.
And that’s it from my side. I tried my best to keep it as simple as possible 😀 . I hope this was helpful. If there are any suggestion to improve the blog, feel free to address them. Do share if you find it useful.